The "Unable to find or create trash directory" error
I have a hard disk drive that is a separate disk to the one that Ubuntu runs on.
A problem started a few weeks ago. When I try to delete a photo from this drive with Image Viewer, I get the error "Couldn't access trash" and it won't let me delete the photo.
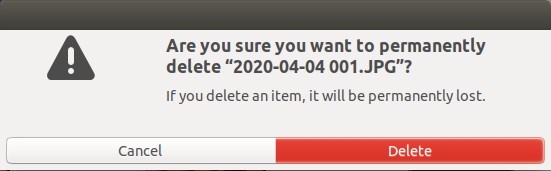
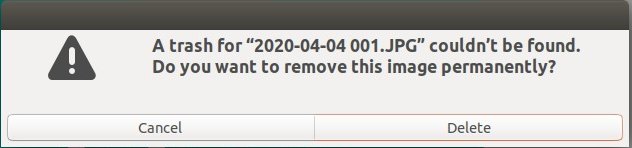 It's annoying. I can delete files with Files but I get the message "are you sure you want to permanently delete [this file]?" Sometimes I get the message "Unable to find or create trash directory".
So I tried to find a solution to the problem.
Creating a new trash folder
I tried simply making a new trash folder:
mkdir .TrashBut this didn't solve the problem. Hmm. What if the folder needs to be called something else? So I tried
mkdir Trash
mkdir .trash
mkdir trash
But none of these solved the problem.
I found that my main trash folder (the one on my SSD) is at /home/paul/.local/share and is called 'Trash'. Hmm. So perhaps 'Trash' is the right name.
However, it seems that trash folders on other drives have to be called Trash-(your uid) instead:
In case you're deleting a file from another device, e.g. a different hard drive or USB stick, Ubuntu will use the (insert mountpoint)/Trash-(insert uid) directory. This is specified in FreeDesktop.org Trash Specification.
What's a uid?
User identifier, $uid — the numeric user identifier for a user. $uid is used here as “the numeric user identifier of the user who is currently logged on”.
You can find your uid by doing either
echo $UIDor
id -u paulI got 1000. So the Trash folder should be called Trash-1000 I guess. So I made a Trash folder with that name. And... the problem still occured.
As a test, I created a new partition. I added a file to it and deleted it. I got the message
"This remote location does not support sending items to the trash".

I went back to Disks, unmounted the partition and remounted it. Then I added a file to it again and deleted it. This time, a trash folder was created. It was called .Trash-1000. It was created in media>paul>test (test is what I named the partition).
So I made a folder called .Trash-1000 at./mnt/82C46E05C46DFBB3. And still this doesn't fix the problem.
Trying to change the permissions on the trash folder
Suspecting a permissions problem, I checked the permissions of the trash folder. To do this, you can either use bash:
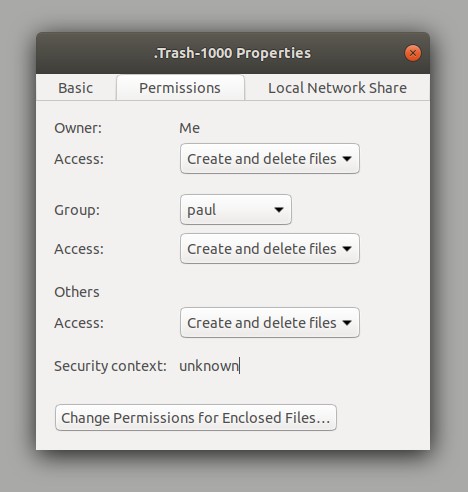
ls -la .Trash-1000or you can go to the trash folder in Files, right-click it and click Properties. For me, it showed the Owner as root. It also said, "You are not the owner so you cannot changes these properties."
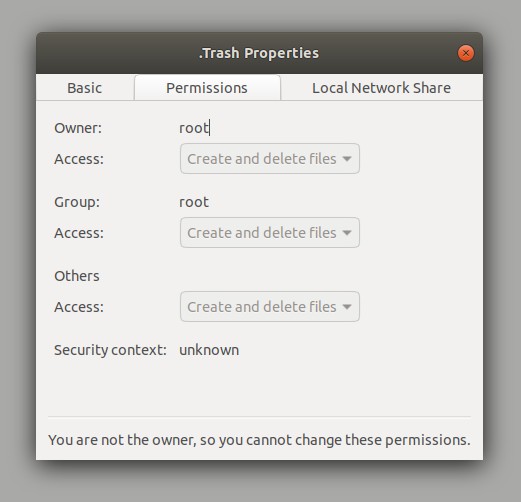
BUT when I checked the permissions of the trash folder in the new partition, the owner was 'paul'.
So I thought that this must be the problem. The owner of the trash folder needs to be me, paul, for it to work. So I tried:
sudo chown -R paul:paul .Trash-1000sudo chown -R $USER .Trash-1000sudo chown paul: .Trash-1000But none of these did anything. The owner was still set to root.
Then I discovered that chown doesn't work on ntfs-formatted partitions:
Forget about chown and chmod, these only work if the filesystem supports unix style permissions, and as you've found out, Windows filesystems do not.
So I tried
chgrp paul .Trash-1000But that didn't change the ownership of the folder either.
Then I had a brainwave. What if I moved the trash folder from the new partition to the old partition? So I tried
mv "/media/paul/HDD/.Trash-1000" .But somewhere during the move, the owner got changed to root. So I tried rsync instead, with a fuckload of attributes:
rsync -AXogavzP --include ".*" "/media/paul/HDD/.Trash-1000" .-A means preserve ACLs, -X means preserve extended attributes, -o means preserve owner and -g means preserve group. I'm not sure what the others mean but rsync wouldn't copy the trash folder without them. Anyway, this didn't work either. The newly created trash folder still had its owner set to root.
Making a new partition
At this point, the only idea I had left was to move all the files to a new partition.
First, I used Disks to shrink the old partition to make room for a new one. The shrink process took much longer than I expected. I assumed it would take a few seconds. Instead, it took a couple of hours. Apparently, this is normal:
It's quite normal for dynamic resizing operations--and particularly shrinking--to take a long time. Files are spread across much, and perhaps most, of the original partition. They have to be re-pieced together to fit them in a smaller space, and the information about where their pieces exist has to be updated.
Then, I moved all the files from the old partition to the new one.
Finally, I deleted the old partition.
Update: breakthrough!
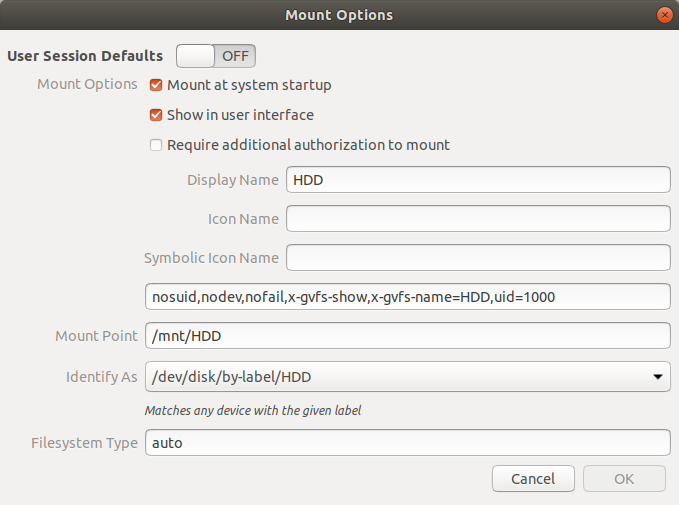
I found the cause of the problem. The cause was simply that I had turned off User Session Defaults in Disks:

Once you turn User Session Defaults back on for the disk, the trash folder works again.
However, it might be that you want User Session Defaults turned off. In fact, there are good reasons to turn off User Session Defaults. One reason, for example, is to make the drive mount automatically.
So, if you want to turn User Session Defaults off but still want a usable trash can, what do you do? Well, askubuntu.com seems to have a solution.
You can do this in GUI by adding uid=1000 to the options just above mount point. Don't forget the comma :). Do a reboot to let this take effect.
My fstab has it like this: LABEL=HOME /mnt/HOME ntfs-3g nosuid,nodev,nofail,x-gvfs-show,uid=1000 0 0
I gave it a go:
I restarted the computer and everything works! I have a usable trash folder again.
Comments
2021-11-25 Herr Flick
I had been suffering with the same problem for a long time. All of my internal drives were fine, but I would have to unplug the external one from the usb and plug it back in again, after which deleting files worked correctly. I had to repeat this upon every reboot - very irritating. Thank you so much for solution at the end, everything is now working perfectly.
Reply
2021-05-21 thanks
Same exact problem and this solved it! Thank you so much!
Reply
Leave a comment